I. Introduction
A. Importance of properly functioning bike brakes
Properly functioning bike brakes are crucial for the safety and control of every rider. Reliable brakes ensure that you can quickly and effectively slow down or come to a complete stop whenever necessary. In this article, we will focus on the importance of tightening bike brakes and provide a comprehensive guide to help you ensure safe and responsive braking.
II. Understanding Bike Brakes
A. Different types of bike brakes
- Rim brakes (caliper brakes and V-brakes): Rim brakes exert pressure on the sides of the wheel rims to slow down or stop the bike. Caliper brakes feature a single pivot design and are commonly found on road bikes, while V-brakes have two arms and offer greater power and modulation, commonly seen on mountain bikes.
- Disc brakes (mechanical and hydraulic): Disc brakes use a rotor and caliper system to provide braking power. Mechanical disc brakes are operated via a cable mechanism, while hydraulic disc brakes use hydraulic fluid to transmit the braking force, resulting in strong and consistent braking performance.
B. How brakes work
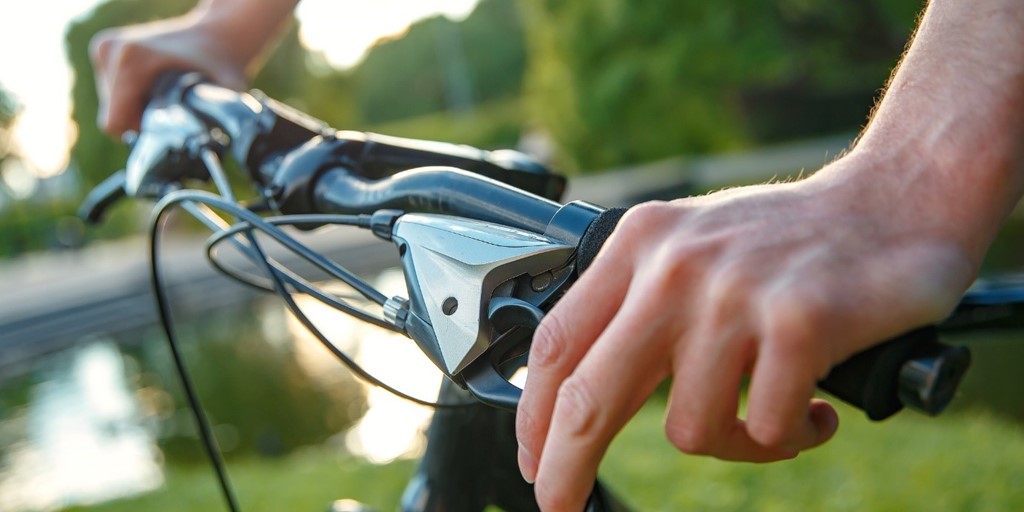
- Brake levers and cables: When you squeeze the brake lever, it pulls on the brake cable, activating the braking mechanism. The cable applies force to the brake calipers or disc brake pistons, causing the brake pads to come into contact with the braking surface.
- Brake pads and braking surfaces: Brake pads, whether on rim brakes or disc brakes, are the components that make contact with the braking surface to create friction and slow down the bike. The quality and condition of the brake pads and braking surfaces greatly affect braking performance.
III. Checking Brakes for Proper Adjustment

Before adjusting and tightening your bike brakes, it’s essential to perform a thorough check to identify any potential issues. Here are the key areas to inspect:
A. Brake lever feel:
Ensure that the brake levers have a firm and responsive feel when squeezed. Soft or spongy brake lever feel may indicate air in the brake system or inadequate cable tension.
B. Brake pad position and wear:
Check the position of the brake pads in relation to the braking surfaces. They should align evenly and make full contact with the rims or rotor. Additionally, inspect the brake pads for signs of excessive wear and replace them if necessary.
C. Cable tension and alignment:
Examine the cable tension to ensure it is neither too loose nor too tight. Loose cables can result in limited braking power, while overly tight cables may cause the pads to drag against the rim or rotor. Also, confirm that the brake calipers or disc brake pistons are correctly aligned with the rims or rotor.
By conducting a thorough check of these areas, you can better assess the condition and adjustment requirements for your bike brakes.
IV. Adjusting Rim Brakes (Caliper Brakes and V-Brakes)
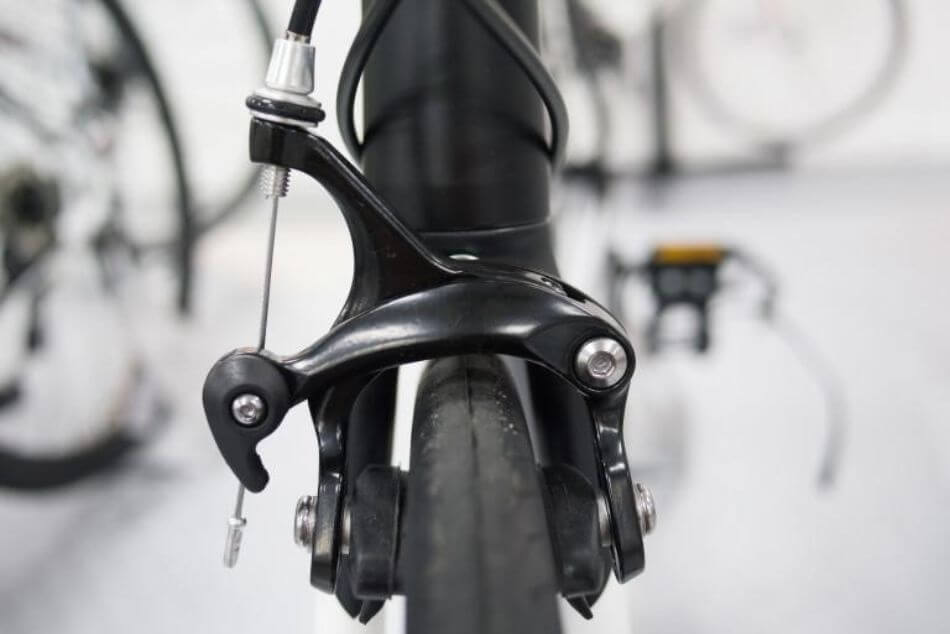
A. Caliper Brakes

To properly adjust caliper brakes, follow these steps:
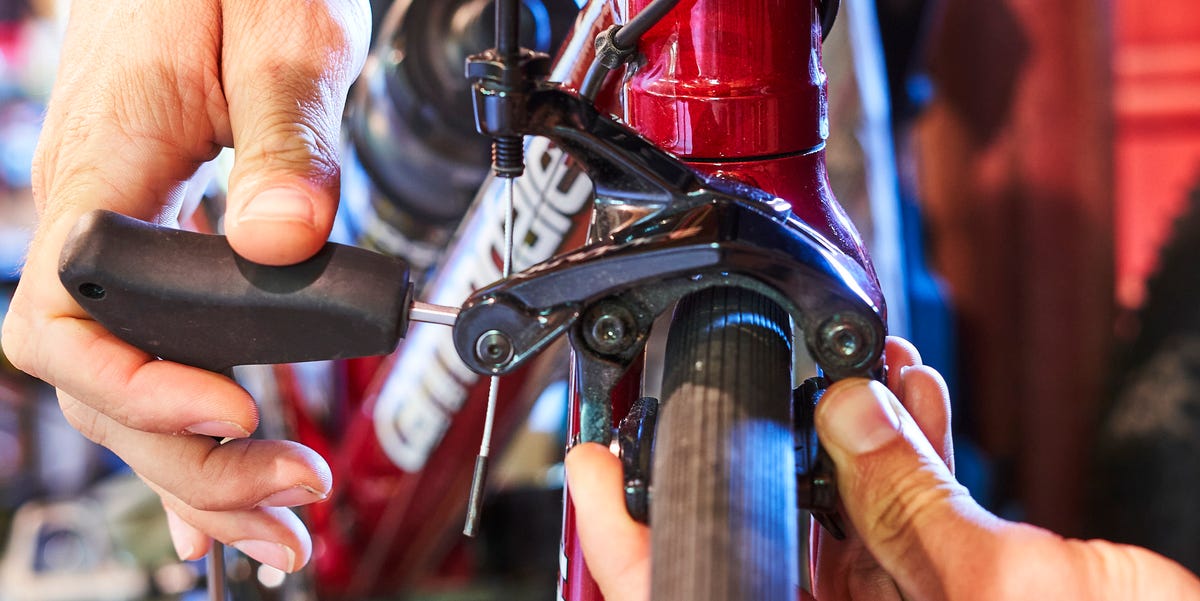
- Loosening the brake caliper bolt: Use an Allen wrench or a suitable tool to loosen the brake caliper bolt, allowing the caliper arms to move freely.
- Centering the caliper: Squeeze the brake lever to position the brake pads against the rim. While holding the brake lever, center the position of the caliper arms so that the pads are equidistant from the rim on both sides.
- Adjusting the brake pad position: If the brake pads are not making optimal contact with the rim, use the brake pad adjustment screw or a wrench to align the pads properly. Ensure that the pads hit the braking surface evenly without rubbing against the tire.
- Tightening the caliper bolt: Once the brake pads are correctly aligned, tighten the brake caliper bolt securely. Test the brake lever feel and confirm that the pads engage with the rim effectively.
B. V-Brakes
To adjust V-brakes effectively, follow these steps:
- Locating the brake noodle and adjusting barrel: Locate the brake noodle, the curved part of the brake cable, and inspect the adjusting barrel. Use the barrel adjuster to fine-tune the cable tension, ensuring proper braking performance.
- Centering the brake arms: Squeeze the brake lever and observe the movement of the brake arms. If one arm moves more than the other, use your fingers to manually center the brake arms so that they are equidistant from the rim.
- Adjusting the brake pad position: If the brake pads are not hitting the rim adequately, use an Allen wrench to align the pads with the rim surface. Adjust each pad until they make even contact, without touching the tire.
- Tightening the noodle and retightening the brake arms: Once the brake pads are properly aligned, tighten the noodle where the brake cable enters the brake arm. Retighten the brake arm bolts ensuring that both arms are securely fastened.
V. Adjusting Disc Brakes (Mechanical and Hydraulic)
A. Mechanical Disc Brakes
To adjust mechanical disc brakes, follow these steps:
- Adjusting the brake pad position using the adjustment screws: Locate the brake pads on both sides of the rotor. Use the brake pad adjustment screws or a suitable tool to move the pads closer to or further away from the rotor as needed.
- Checking the alignment of the rotor and caliper: Observe the gap between the brake pads and the rotor. Ensure the rotor is centered and doesn’t rub against either brake pad. If necessary, make small adjustments using the caliper mount bolts until the rotor runs freely.
- Adjusting cable tension if necessary: Fine-tune the cable tension by using the barrel adjuster on the brake lever or at the brake caliper. Ensure that the brake lever feel is firm and responsive without excessive play or drag.
B. Hydraulic Disc Brakes

To adjust hydraulic disc brakes, follow these steps:
- Checking brake lever feel: Squeeze the brake lever and observe the lever feel. It should be firm and respond with smooth engagement. If the lever feels spongy or has excessive travel, it may require bleeding to remove air from the system.
- Bleeding the brakes if needed: If you notice consistent sponginess or poor braking performance, it may be necessary to bleed the hydraulic system. Refer to the manufacturer’s instructions or seek professional assistance for this procedure.
- Adjusting brake pad position and alignment: Inspect the brake pads and ensure they make even contact with the rotor. Use the adjustment screws or pistons on the caliper to adjust the pad position and alignment if necessary.
VI. Testing and Fine-Tuning Brake Performance
A. Checking brake pad clearance and alignment: Spin the wheel and observe the brake pads to ensure they clear the rim or rotor consistently without any rubbing or excessive noise. Adjust as needed to achieve ideal clearance.
B. Testing brake responsiveness and stopping power: Find a safe area to test your brakes at various speeds. Gradually apply the brakes to gauge their responsiveness and stopping power. Confirm that the brakes engage smoothly and bring the bike to a controlled stop.
C. Making further adjustments if necessary: If you encounter any issues during testing, such as uneven pad wear, poor braking power, or excessive play, re-evaluate and fine-tune the adjustments made earlier. Consult the manufacturer’s instructions or seek professional help if needed.
VII. Safety Tips and Best Practices
A. Regularly inspecting and maintaining bike brakes: Consistently check your bike brakes for wear, damage, or signs of inefficiency. Clean the braking surfaces, replace worn pads, and address any issues promptly.
B. Proper technique for braking: Apply the brakes progressively and evenly across both front and rear brakes to avoid skidding or loss of control. Center your weight over the bike and maintain a balanced position while braking.
C. Importance of seeking professional help for complex brake issues: For complex adjustments, bleeding hydraulic brakes, or addressing severe brake issues, it’s recommended to consult a professional bike mechanic to ensure proper repair and maintenance.